
Go from I don’t know to I’ve got this! with these 8 tips for taking better iPhone pictures.
After years of hearing friends, family, and peers tell me they wish they were better at taking photos….I decided to do something to help. I have to pinch myself that I get to call my passion my job, and I just want to share my love of photography with others. I created this guide so that others could take the tool they have in their pocket, and transform it into an instrument for their creative outlet, their legacy, their memories. I hope these 8 tips for taking better iPhone pictures leaves you confident in capturing your everyday moments, both the big and little.

Clean Your Lens
Nothing ruins a photo faster than a smudge from little fingers, dirt from your pocket, or a crumb from your purse that’s blocking your lens. These can add unwanted smudges or spots on your photo! Make it a habit to clean your lens before you use it. I like to carry a little microfiber cloth around in my purse or diaper bag. If not a cloth, whip out the bottom of your shirt from that French tuck, and give the lens a swipe.
Use Your Shortcut
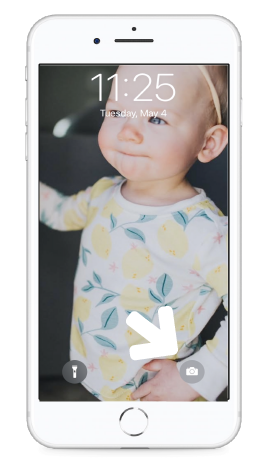
Have you ever been in a setting where you think “OH, this would make a great picture!” but by the time you unlocked your phone and found your camera icon, the moment has passed? ME TOO. Did you know there’s a shortcut for this? Embarrassingly, this photog didn’t either for a while. Well, there is! In the bottom right hand corner of your lock screen is a camera icon. If you hold it down, your iPhone will bypass the lock screen and bring you straight into the camera app for quick and easy capturing.
Look for Clean Spaces
There’s nothing like clutter to distract from a beautiful photo. Move your subject to a tidy and simple location. You don’t have to have a sparkling house, just an area with few obstructions to take the focus away from your subject.
An example: our play room.

I chose to use the side of the room with a simple couch with one set of toys, rather than a book covered messy play zone area with too many distractions.
Take Multiple Photos
In a perfect world, you would nail the shot on the first time every time. Also in an ideal world, my laundry and dishes would always be done. It’s just not realistic. When taking your photo, take at least 5 (yes, 5!). You can always go back and delete the ones with closed eyes, blurry images, or funny faces. You can’t always go back in time to capture the moment, so be proactive when clicking your shutter button.
MOVE

Remember those 5 photos I told you to take? Well, they shouldn’t all be taken standing still. I like to move it move it. Move left, move right, shoot above your subject, get down low on their level. If you’re taking 5 of the same exact photo, you will get the same exact end result. By moving, you now get 5 completely different photos with varying angles – and I guarantee at least one of those five will be your winner!
Flash is Phony
When you can, turn that flash off. Flash tends to create unnatural looking photos and can sometimes emit strange glares or hues. Natural light is always going to give you the best colors and textures on your photo. Sure, you might have to use flash when it’s completely dark outside, or in a very poorly lit room, but whenever possible, use the light from the sun.
Use Your Grid
A lot of photography fundamentals revolve around where you are placing your subject. For example, centering your subject, or placing them in the lower bottom of your frame (rule of thirds), or maybe using a horizon to frame the photo horizontally. A key to composition is knowing where these points and lines are in your frame and your grid is the PERFECT tool for this. It helps you lay out your photo before you even hit the shutter button.
To ensure this is turned on go to:
Settings > Camera > Grid (under Composition)
Lock Your Focus
Did you know you can touch the screen while taking a photo to set where you want the focus of the photo to be? Whether it’s a face, or an item, touching the screen will pull up a little yellow box that will set that as the focus of the photo.
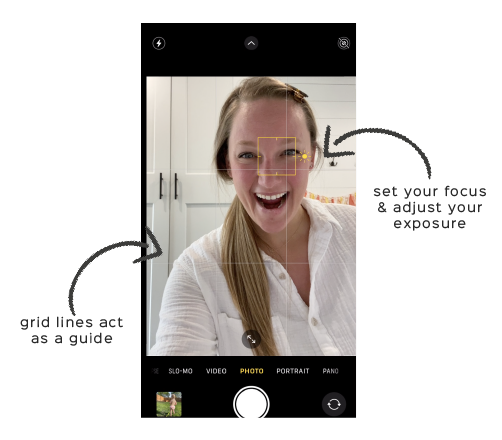
BONUS TIP: See that little sun icon, if you hold your finger on your focus point, you can drag the sun up (to make photo lighter) or drag it down (to make photo darker). This will increase or decrease your exposure (light).
WANT MORE?
I have a course just for you!

LEARN:
•How to Take Professional Photos Using Your iPhone
•Lighting Basics and Challenges you May Face
•Composition Fundamentals of Photography and How to Use them to Take Better Photos
•Posing Tips and Tricks
•iPhone Camera Settings and Tools
•Presets: Where to Find Them & How to Use Them
•How to Edit using Lightroom Mobile
Learn more about the course here!

comments +